You all HAVE to check this awesomeness out!!!
Sunday, October 30, 2011
Made by Munchie's Mama Gift-Giving!!!
HOMEMADE WAFFLES!!!
To start...this is what happens when I ask my husband to take a picture and he goes "what? for your blooooooooooooog" haha so I end up taking it myself...That is my 4 1/2 month old strapped to my back in the Ergo...she fell asleep..SUCCESS

Here's my recipe...I can't remember where I got it from but these are my top 3 guesses:
1..RecipeGrazer iPhone App
2...All Recipes
3...Somewhere on Google :)
INGREDIENTS:
2 Large Eggs
2 Cups All Purpose Flour
1 3/4 Cup of Milk
4 Tspns Baking Powder
1/4 Tspn Salt
6 Tablespoons of White Sugar
6 Tbspns Veggie Oil (If you do not have Veggie Oil you can use equal parts Mayo...trust me...it tastes EXACTLY the same...just try it..seriously trust me)
1 Tspn Vanilla Extract (optional)
Cooking Spray
Now I forgot to take my progress photos but it goes easy peezy like so:
Step 1...Beat eggs in a LARGE bowl with a whisk until fluffy (or with a hand mixer if you didn't break yours like I did on Friday...it was a sad day)
Step 2...Preheat your waffle iron...I do this after the eggs because mine preheats quickly
Step 3...My recipe says beat in remaining ingredients...I just put the flour, milk, baking powder, salt, sugar, veggie oil (or mayo), and vanilla extract all in on top of the eggs and then beat away until well blended
Step 4...Spray your waffle iron
Step 5...Pour batter!! I used about 1 cup but use enough to cover your waffle and then close. It is done when the waffle iron stops steaming.
Add whatever topping you want!..berries, butter, whipped cream, chocolate syrup, or just plain syrup!!
We made turkey bacon to go with it! Breakfast for dinner is always the best!! I'll take the "progress" pictures the next time we make them and add them here :)
ENJOY!!!
~ Lisa
Saturday, October 29, 2011
Halloween Ribbon Hair-Bow!!
Who wouldn't want to make one of these super easy hair-bow's!!?? All you need are these "probably in your closet" materials:
scissors
glue gun
festive colored ribbon
felt
candy corn (or a fun embellishment for the top)

First I cut all the ribbon in half, like so...heads up again...I do everything the hard way haha...and I also got ahead of myself and 1 set already haha

Then, I glued them all into circles..liiiiiiiiike this :) and then together (if that makes sense..I posted a pic)

After I glued them together, I snipped the ends diagonally on 2 of them to give them "pointy" ends:

And then I started stacking:

I attached a piece of felt to the back and then from there you can attach the amazingness to a headband...hair tie...or hair clip!!!

AND VOILA!!

I hope you enjoyed my quick and easy (and most likely freeeeee) halloween hair craft!!!
I'm linking up here!!

I'm linking up here!!
~ Lisa
Helping Our Military!!!
Well it's that time of year again and I, honestly, have never thought about this because my husband is luckily attached to an aircraft carrier so if he's not in the helicopter or in a port, he can be found, most of the time, on the ship at night when he is deployed.
Now...there are many branches of the military and then all of the jobs within those branches...for example; SEAL's, Recon, and Rangers just to name a few. Being on the ground in the military in Afghanistan during the winter time is cold...you think the east coast is cold...try middle of the desert.
I grew up in Escondido, CA across the street from Director of Operations for Operation America Cares. There is a SLEW of people involved with this organization and they assemble, pack and ship care packages to our US Troops serving overseas. They are a volunteer run organization and are always in need of donated items (can be seen here). You can also find them on Facebook here.
They are truly amazing!!
HERE IS THE BIG PART!! IT IS GETTING REALLY REALLY COLD OVER THERE!!
They are starting to collect cold weather gear in black, camo and tan colors so it will blend in with their uniforms. Beanies and scarves...they need their fingers so thick mittens might not be great but maybe fingerless gloves? (contact them to be sure here). They are shipping ALL the time and winter lasts a while but the first shipment will be going out November 19th!
If you can help, please contact them!!
Thanks!!
~ Lisa
Thanks!!
~ Lisa

Thursday, October 27, 2011
Pinterest Challenge!!!
WHOO PINTEREST CHALLENGE!!!
OMG...Like I'm not already totally, beyond obsessed with Pinterest...this is SUPER COOLTASTIC!!
OMG...Like I'm not already totally, beyond obsessed with Pinterest...this is SUPER COOLTASTIC!!
Check this out...

YEAH!!! Found it over at The Bower Power Blog...This will be fantastic!!..I can't wait to get started...This also means I will have to create a board for the Pinerest Challenge!!!
You love Pinterest too?? GET ON THIS!!
~ Lisa
Cold Hands, Warm Hearts!!
This is fantastic!! I'm getting involved...how about YOU! Click the button below for more info...just to flipping cool!!

Tuesday, October 25, 2011
SILHOUETTE GIVEAWAY...say whaaaaat!?!
Holy manoley!!! TTJ is hosting a Silhouette giveaway...and not JUST that fantastical machine...it's the Cameo & Starter Kit!!!...$340 value!!!
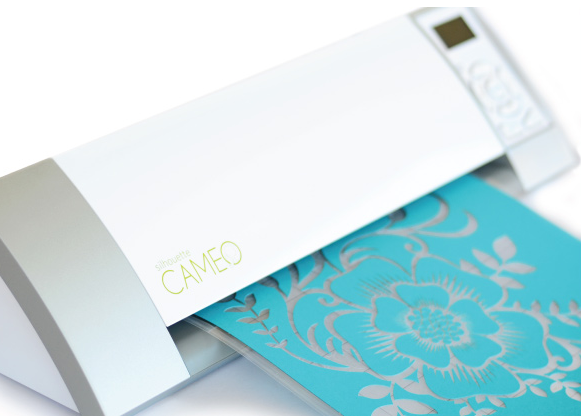 {source} I mean come on...This is just amazical!!!
I seriously just posted earlier today how I would LOVE a Silhouette for Christmas or early Christmas...HERE'S MY CHANCE!!! And yours!!!
All the details are here!!! Head over!!! It ends October 30th!!! She also has a promotional discount running with Silhouette so go!! go now!!!
Good Luck!!
~ Lisa
Gumball How To!
So for Emma's 3rd Princess Belle Birthday Bash I wanted to make some cool party favors and I found THESE!

No they have nothing to do with "Princess Belle" and they aren't even princess colors BUT they are pretty fantastical!
Here's how I spun them:
Materials via Tammy Mitchell Photography:
-Terra cotta pot and base from your local craft or home improvement store (MY OWN NOTE: I found that these pieces are cheaper at your craft store...and if you have a coupon..BONUS SAVINGS)
-small round votive holder (in the glassware/candle holder section at Michaels)
-red spray paint (MY OWN NOTE: I used yellow, Princess Belle's dress color, for the girls & chalkboard paint for the boys)
-E6000 adhesive (also available at your craft store)
-small wooden balls/knobs they are in the wood section of your local craft store. they are flat on one side making them easy to adhere to your machine
All together I made 20 and it set me back about $25...not too shabby!!
Here is my before and after pics...I'm working on remembering to take the pictures haha

**The boys also got a piece of chalk :).
This is super simple and looks so cool! They even fit in little gift bags so I put the chalkboard one's in blue bags for the boys and the yellow one's for the girls in pink bags!!
HAPPY CRAFTING!!!
~ Lisa
10 Tuesday's!
OK so...whether we like or not the holidays are HERE!!! I have a killer list of 10 DIY Holiday gift/crafts!!
Just a heads up...I have a thing for giving gifts that can be used, re-used and/or are needed...I'm not huge on gifts that I know I would just set down and forget about (maybe...dare I say...re-gift!!!) so I always try to give things to people that they will use...
The kids can even get in on some of these!! FYI...I am addicted to Pinterest, Tip Junkie, Ana White, and all of you amazing blogging crafters!! So here are my inspirations for DIY Holiday gifts/crafts!!!
PS...I'm planning on doing ALL of these in December so this is also my motivation to DO them :). So come on back to get awesome tutorials and motivate me to get them done!!
So...without further adieu...
My 1st Top 10 List of Holiday Crafts/Gifts!!
10. I found Ashley over at Shanty2Chic via Ana White's fantastic website. She used a killer Potterybarn Photo/Greeting Card Carousel as inspiration for, what I think, is a more awesome Carousel!!! You can paint it any festive color OR leave it white OR mod podge some cool border...attach some family photos as a gift for extended family!! This amazical , and what would be your own one of kind gift, will only set you back about $10 depending on what you already have!

{source}
9. Who doesn't LOVE receiving pictures for any type of celebration!? And how GREAT of an idea is this!! I found Jessica's tutorial via Tip Junkie for this super cute damask print frame. Assuming you are crafty and have supplies on hand, this could set you back a whopping $0!! Frame...check, paper....check, mod podge...check...accessories....CHECK!! You can put whatever cute spin you want on it!! MAYBE...even throw some lettering...I <3 Dad, or Grandma's Favorite, or even Me & Santa!

8. Jamie, Jodie and Jen over at eighteen25 are pretty fantastical. This is a super score for that awesome teacher in your child's life. You can fill it and decorate with any type of theme that super tremendous person has in their classroom or maybe by what grade they teach! The kids can TOTALLY help with this too!!

7. I LOVE PINTEREST!!! I found this reindeer on there and um HELLO {easy} KID'S CRAFT ORNAMENT!! The best is this won't break or if it does it isn't something a little glue won't fix!!

6. OK...I am a child inside haha...snoman poop and reindeer poop NEVER get old!!!!
Snowman Poop: Free PDF printable
Grab a ziploc baggie and fill with mini marshmallow's or white chocolate chips
Seal and attach the tag!!

I hear you've been naughty,
So listen, here's the scoop...
I'm running short on coal this year,
So you get "Snowman Poop"
Love, Santa
So listen, here's the scoop...
I'm running short on coal this year,
So you get "Snowman Poop"
Love, Santa
Reindeer Poop: Free Printable PDF
Grab a ziploc baggie and fill with whoppers or milk chocolate chips
Seal and add the tag haha

I woke up with such a scare when I heard Santa call...
"Now dash away, dash away, dash away all!"
I ran to the lawn, and in the snowy white drifts,
those nasty reindeer had left "little gifts".
"Now dash away, dash away, dash away all!"
I ran to the lawn, and in the snowy white drifts,
those nasty reindeer had left "little gifts".
I got an old shovel and started to scoop
Neat little piles of "reindeer poop."
but to throw them away seemed such a waste,
So I saved them, thinking you might like a taste!
Neat little piles of "reindeer poop."
but to throw them away seemed such a waste,
So I saved them, thinking you might like a taste!
As I finished my task, which took quite a while,
Old Santa passed by and he sheepishly smiled.
And I heard him exclaim as he rose to the sky~~~
"Well, they're not potty trained, but at least they can fly!"
Old Santa passed by and he sheepishly smiled.
And I heard him exclaim as he rose to the sky~~~
"Well, they're not potty trained, but at least they can fly!"
hahahaha I love it!!
5. OK...Desirée over at 36th Avenue is just..superfantabulous and this is such a great idea!!! You HAVE to check her out if you haven't already!! Plus this is yet another reason I know that I think I need a Silhouette machine heehee ;-)

4. Food...I mean come on...who doesn't LOVE a gift they can consume!!! I LOOOOOOOOOVE Starbucks' Chai Tea Latte so when I saw this, Chai Spiced Tea Loaves, in Good Housekeeping's "Easy Homemade Holiday Food Gifts" article, I was sold...especially since it says "easy" hahaha
 {source}

3. I found this idea on Pinterest..print on paper bags, punch hole, add reinforcement sticker and twine..DONE...and you can fill it with whatever you want..socks...candy...underwear? haha and print whatever witty, funny, or thoughtful thing you want!

2. Here's one for the kids!!! Found on Pinerest too haha. Super easy and simple and to keep it in tact spray hairspray on it when it's all dry and it will keep the paint from flaking or if you're super cool and have a laminating machince...send it through!!

AND DRUM ROLLLLLLLLLLLLL....THE #1 HOLIDAY GIFT/CRAFT I WANT TO DO THIS YEAR.....
1. again...via Pinterest :-)...I want to do an ornament like this with the girls this year!!

Well, I hope you all enjoyed my list!! Come back later and watch how I get them done!!
I'm linking up with Miss Mommy's Ten Tuesday's!!
~ Lisa
Monday, October 24, 2011
Fantastic weekend!!
What a great weekend! Weather was great and the kids were great!
Saturday we went to a baptism for our friends' daughter, Lily, who is a month older than Taitum. We watched from the outside side door since I have a crazy 3 year old and, not kidding, the doors were locked when we got there...then we went to the park for a YUMTASTIC BBQ and Emma ran around with Uncle Chris and anyone who would play with her haha (Dad had to work)...Oh so the slide there had like a 2 ft drop into the sandbox...I didn't know so I just told Emma "just slide down, we need to go eat" THUNK!!! And she didn't get a nap/quiet time in so instant tears/panic and then she kept asking everyone "what's your name? I hurt my butt" hahaha. She was all good. Reuben cooked up some yummy burgers & hot links & brats mmmmmm and fruits and Taitum MOWED through some avocados and then slept fantastically!! Then YUM cake!! Chocolate cake with a strawberry (I think) filling mmmm sooooooo goooooooooood. Stomach ache heaven but so worth it hahaha.
Sunday, Sunday, Suuuuunday!!!! This is my designated "day off" as long we don't have plans and Mike is home. So on Sunday my friends Jeanette and Brandy came over and Brandy brought lots of goodies (cookbooks, plastic containers, crafty stuff...she's moving to Oregon so Jeanette and I get her purge hahaha). So around 1 I think we headed to base and went through the Exchange & Commissary. Grabbed some yummy lunch at Five Guys and in between stores a yummmmmm Starbucks salted caramel mocha; aka a really bad weakness haha. Brandy scored some awesome Halloween gear and Jeanette got tons of groceries!! Super fun!! Good food, good company, good time!!
AND....My PACKERS ARE 7-0!!!!!! SO AWESOME!!!!!!!
Now it's Monday...Taitum is getting some shots today :-( so it will probably be a chillaxing day and then off to Incle Chris & Auntie Vilda's house for some MNF & Sing Off!!!
Enjoy your week!!!
PS...I've really gotta get better at taking pictures...
~ Lisa

Friday, October 21, 2011
Friday Night Thought for my Girls
So I was thinking today...
My girls are getting so big...too fast.
Emma is 3 and Taitum is 4 months. The 3 years FLEW by and the 4 months seem like they are going by faster.
I have times where I feel like I'm neglecting Emma because Taitum needs attention (I am still breastfeeding too).
Then there are other times I feel like I'm neglecting Taitum because Emma and I are doing something that Taitum can't do yet. I, then, find myself thinking back to when Emma was that age and wonder if I'm not giving Taitum enough attention.
A lot of things change when you have a second child 3 years later.
You can't just get up and go.
You have to time your trips/errands (these are some of the times I feel like I'm not giving Emma enough attention).
You have to make sure you have enough stuff of you're going to be gone all day.
You need to make sure you're wearing "easy access" tops, as I say, if you're breastfeeding and you're on the go.
A lot...not so important I guess.
I know Taitum will be 3 in no time but then Emma will be 6!!
I know they'll be up and running around and playing together very soon.
I want that time to come sooner than later but I also want them to stay little.
Bittersweet I guess...can't have it all haha.
All in all...Emma is the best older sister Taitum could ask for. She is so gentle and fun with Taitum. Emma is the only person who can get Taitum to just stop whatever she's doing/looking at and start laughing...hysterically. Emma is already Taitum's idol and role model.
It's amazing how Taitum just watches Emma run around, sing, dance, talk, everything. There are seriously no words. It's amazing.
I hope, inside, they never grow up...laughter is the best medicine...if you take life too seriously & follow every. single. rule, it will pass you by as fast as lightning...I want them to experience the ultimate high's of life and make sure they know that when the ultimate low's come around, we will be there for them...everything, no matter how bad it hurts, everything happens for a reason...
There is SO MUCH world out there for their little eyes to see...I need a better camera ;-)
I LOOOOOOVE THEM SO MUCH!!!
Always have fun & always stay young :)

<3, Mama
My first DIY reupholstering project!!
So while I was pregnant with Taitum we were in the process of moving so that "nesting" period never really took full effect.
Well we were in our new place by June and that's when I started googling things like "DIY furniture" and watching the DIY Network and lots of HGTV!! I stumbled upon my first blog Centsational Girl and then found Curbly. *SPARK* literally went off in my head...like a little part of my brain emerged & I am now realizing how to turn my furnish and decorate my house in the shabby, eclectic, vintagey style I looooooove but am not a fan of the price tags.
The big baby girl (ok not totally big. She's just huge now haha) came June 15th :-) so I started my projects that next month.
The project...turn my Salvation Army $20 coffee table into a bench/shoe storage for the entryway!!

This was the entryway before...it just didn't work.

So I found the best tutorial on Curbly for reupholstering and appropriately titled "How To Turn an Ugly Coffee Table into an Upholstered Bench"! I was a beginner so I just had my husbands power tools which are not handy for this project. Off to Joann's Fabric for the fabric and foam and batting and long needle, Home Depot for the paint & brushes, and Wal Mart for a staple gun and buttons. I received an awesome power sander from my mother in law for my birthday so that was first...sanded the whole thing!
Sorry...I forgot to take a picture of the before and after sanding BUT you're going to want to sand the area you want to paint. If you want to give it that "tuffed" look with buttons make sure you drill your holes now. Drill exactly where you will be putting them. I put 5; 2 on the side and 1 in the middle.
Now..I have no patience especially when it comes to letting paint dry so I always get the paint with the primer at Home Depot..and another note...I am TERRIBLE at painting so the shabby/vintagey look I LOVE is really easy since I am definitely NOT a perfectionist hahaha. Here's a picture of what my bench started to look like with some of the fabric (minus the foam).

I LOOOOOVE!! Yes I forgot to tape off the legs so I did get some paint on them...it comes off easy...no biggie.
Now I did sand the top because to put the the foam on you are going to want to spray adhesive to the top (like in Curbly's instructions)..it works fantastic and of course I did not take a picture. Now here's a hint...make sure your foam is centered or at least even haha. I ended up putting the foam on the ground and flipping the table over so I could place the table on top of the foam...side note: this table was HEAVY!!! But again...I do things the hard way.
Next (again no photo sorry...), you will want to cover your foam with batting. Cover the foam and then make sure you have at least a couple inches more on each side (you can trim it after you staple)...Now get out your staple gun!!
Pull...Pull..Puuuuuuullllllll the batting so the foam bends creating that "bench like curve"...make sense? The batting also lets you make sure it's nice and smooth. Start stapling in the center of each side and then pull the batting diagonally. Do the corners LAST.
To give the corner that stellar wrapping look...fold the batting like you would wrapping paper..easy peazy, lemon squeezy!!
Now the fun part!! Grab your fabric!! You're going to want to staple the fabric on the same way you did the batting. Now once you get your fabric on grab your buttons and hook them up!! Poke your needle through the holes you drilled in the beginning. PULL the string and secure. This will give it that "tuffed" look.
And this is my finale!! VOILA!!

I just recently changed the handles to these spiffy, not matchy matchy knobs I got in my super awesome Pick Your Plum mystery box!!


Here is the entryway after!! I already have ideas on changing it since the amount of shoes out-weigh the amount of space I thought I created haha. And no I am not done with my door turned chalkboard hanging thing hahaha...yes those are spoons :)

For my first upcycle/reupholstering/painting project, I don't think it's half bad!...I
Things I have learned:
I need to shorten my tutorials.
I need to make my tutorials easier to follow but shorten them at the same time.
I need a better camera hahaha...sorry my pictures are not fantastic haha.
Thanks for reading my essay!!
~ Lisa
Thursday, October 20, 2011
Giveaway!! 3 Four and Under: Maynard's Mousetrap Giveaway
Head on over to 3 Four and Under and check out this great giveaway she's hosting! Maynard's Mousetrap is a super cute Etsy shop with great one of a kind pieces!!
3 Four and Under: Maynard's Mousetrap Giveaway: Happy Thursday everyone! I'm excited to bring you this fun giveaway today! I want to tell you about Maynard's Mousetrap ! Julie...
Good Luck!!!
~ Lisa
Juneberry Photo Giveaway!!!
OH...MY...GOSH...I went to school with this awesome photographer and last month she photographed my long time friend's (I say long time as in I've known him since...ready....PRESCHOOL!!!!) wedding!!!
You HAVE to check her out!!! She recently gained 1,000 fans on Facebook and is having a SWEET GIVEAWAY!!! And yes...I have gained an entry by blogging about it haha :)
What does the winner get?? WELL!!! Just a fully styled, magazine worthy photo shoot!! Hair, make-up, clothing styling, and set design...THAT WHOLE THING!!!
This awesome giveaway is sponsored by these 3 great companies:
The amazingly cute and adorable, vintage baby & children's clothing line on Etsy: 3ringcircus
This great company which is a combination of the the awesome Juneberry Photographer, Jessie Kenney, and Heather Rome, the brain behind 3RingCircus: Hey Kid!
Babiekins Magazine aka a super fantastical magazine that is geared towards everything trendy for you and your little one(s): Babiekins Magazine
Be sure to check out the whole giveaway here at Juneberry Photo...you know...the fine print of rules and stuff :)
Good Luck Everyone!!!
~Lisa
Wednesday, October 19, 2011
Halloween Pail
The making of Emma's Halloween Pumpkin Candy Pail!!!
No, it isn't perfect BUT according to Emma, she's a "lady" and I think it's pretty spiffy hahaha
Supplies:
Plastic Pumpkin (I got Emma's at Michael's. They're 50% off right now too)
Pen
Festive Ribbon (3 pieces)
Puffy Balls
Googlie Eyes
Felt (I used Black for the mouth & orange and yellow for the "hair"
Pipe Cleaners (I used pink for the mouth because Emma said so haha)
Hot Glue Gun
Knife
Scissors
Alright...bare with me...WARNING: I DO THINGS THE HARD WAY...and then I realize there was an easier way so...I apologize in advance haha
First, you're gonna want to cut a hole in the top of your pumpkin. I drew something that looks like a circle so I could use it as a guideline. Don't worry about it being pretty...I'm a master at hiding imperfections heehee


Then, you are going to want to mark where you want your holes on each side for your handle. I used a knife (I know...not safe and probably not practical..again...I do things the hard way or convenient way? haha).

Thanks to the amazing mystery box I bought from Pick Your Plum, I have festive ribbon!!!

Emma is your ultimate girly girl and I asked her what color she wanted for her handle and she said/yelled, "PURPLE!! PURPLE AND POLKA DOTS!!"...So, I used purple, purple and polka dots, and green because it's fun and we are going to braid the ribbon so create a sturdy handle.

Now, tie a knot on end so they're all connected and tape it to a surface...tape it well...or you'll get frustrated like me and end up putting your case on the end so it stops coming off while you're braiding it hahaha


Braid away!!! Make sure to not braid the entire ribbon length. Well, unless you want a cross-body handle...then go ahead haha. PS...don't mind my kitchen table..yes it's a door...yes i LOVE it...no I have not gotten around to getting glass for the top...it will happen soon :)

ALRIGHT!! NOW, put your ribbon into one of the holes you created. So HERE is my "OMG this would have been so much easier" moment..instead of taping and getting frustrated because your ribbon keeps coming up, try putting the ribbon in your pumpkin FIRST, tie the knot so it's secured to your pumpkin, and THEN braid away...easier huh?

When you tie the ends inside, I pulled the ribbon through the hole so it was easier for me tie the knot versus trying to get my hand inside the pumpkin to tie the knot

WOO! Handle...MADE!!

Now the fun part...put a face on your pail!! This looks creepy but it's what I did. Emma said she needed an orange nose so and orange nose is what she received.

OK...now get out your hot glue and glue away!! I have a love/hate relationship with mine...burning myself ALWAYS occurs!
So now you say to yourself or your computer screen "Hey Lisa...what do we do about this nasty foam stuff?"
Well, I'm glad you asked!!! FELT! Emma said she needed orange and yellow hair. I cut up some random strips of the felt and then flip flopped the colors around the hole using my handy dandy glue gun. I put glue (if you can see it) on the white part and then laid the felt strips, alternating the colors, all the way around.

Then, I hot glued just a portion of the hair (like below) so the "hair" was still kind of wavy.

And this is what we came up with!!! I attempted to glue the inside with a felt "liner" but I'm not that crafty...YET. I also made a little "bow" with some rick rack (also from my amazingly fantastical Pick Your Plum mystery box) and put a pink fuzzy ball in the middle...she's a lady remember?

And here it is!!! Yes...the mouth is a little scary...but it works :)


I hope you enjoyed this, I hope it made sense most of all, and it sparked some ideas!!!
~ Lisa!!
Subscribe to:
Posts (Atom)